
동기
최근 꽤나 많은 Retrofit 통신 코드를 작성하게 되어, 자연스럽게 Coroutines 코드를 함께 작성하고 있습니다. 그 과정 중에 궁금했던 부분들이 많았습니다.
최근에 Flow<T> 의 취소에 관련된 포스트와 Retrofit 의 통신 방법에 관한 포스트를 작성하면서 참고했던 레퍼런스에도 Coroutines 키워드를 심심찮게 만날 수 있었는데, 와중에도 궁금한 점들이 계속해서 생겨났습니다.
구조에 대해 깊게 알게 되면, 실제로 코드를 작성할 때에도 해당 기술의 어떠한 포인트에 유의하며 작성해야 하는지 알 수 있게 됩니다. 그러한 의미에서, Coroutines 에 대해 자세히 알아보고자 합니다.
Kotlin Coroutines
사실, 이미 Coroutines 에 관한 여러 포스트를 작성했습니다. 아래와 같은데, 관심 가는 글이 있으시다면 한 번씩 읽어보셔도 좋을 것 같습니다.
코루틴과 그린 스레드
Coroutine 코루틴은 작업 수행을 일시 정지 및 재개될 수 있도록 하는 프로그래밍 구성요소입니다. 코루틴은 서브루틴을 일반화합니다. 협력 작업, 예외, 이벤트 루프, 반복자, 무한 목록 및 파이프
blothhundr.tistory.com
Coroutine Dispatcher 란 무엇인가?
안드로이드 개발을 꽤 오래 하셨던 분들, 또는 지방에서 일하고 계신 분들은 자바로 안드로이드 개발을 해보셨을겁니다. 저 또한 그랬습니다. 처음 개발을 배울 때부터 자바로 배워서, 코틀린같
blothhundr.tistory.com
StateMachine 과 Stackless Coroutine
Coroutine Coroutine(코루틴) 은 비선점형 멀티태스킹 솔루션입니다. 동시성 프로그래밍을 구현하기 위한 기법으로, Kotlin 은 언어차원에서 제공합니다. 코루틴에 관한 설명은 다음 포스트에 자세히
blothhundr.tistory.com
Coroutine Details
지극히 개인적인 생각들 Kotlin 을 독학하고 사용한 지 1년이 조금 넘는 기간 동안, 수없이 많은 코루틴 코드를 작성해왔습니다. 처음에는 단순히 비동기 처리를 위한 수단으로만 사용하였고, 코
blothhundr.tistory.com
Coroutines 를 이해하기 위해 알아야 할 키워드를 꼽아보자면 다음과 같을 겁니다.
- CoroutineContext
- CoroutineScope
- CoroutineDispatcher
- Continuation<T>
- ContinuationInterceptor
- Job
- Deferred<T>
- functions
각 키워드에 대해 자세히 알아보고자 합니다.
CoroutineContext
CoroutineContext 는 CoroutineContext.Element 를 요소로 받는 Indexed Set 입니다. 각 요소는 각자의 키를 가지고 있고, CoroutineContext 에서 키로 각 요소에 접근할 수 있습니다.
내부에는 다양한 메서드가 선언되어 있습니다. 그중에는 operator 키워드가 붙은 plus() 메서드도 보이는데, 특정 CoroutineDispatcher 와 함께 예외처리를 위해 CoroutineExceptionHandler 등을 추가할 때 '+' 를 사용하여 추가할 수 있습니다. 또한, get() 메서드나 minusKey() 등의 메서드로 특정 CoroutineScope 내의 요소에 직접 접근 및 삭제를 수행할 수 있습니다.
CoroutineContext 가 Coroutines 에 대한 이해의 필수 요소인 이유는, 모든 Coroutines 는 CoroutineContext 상에서 실행되어야만 하기 때문입니다. 이유는 간단한데, 동시 다발적으로 수행될 수 있는 각 Coroutines 작업들에 대한 실행 환경과 제어 권한을 작업의 진행 상황 동안 유지 및 활용하고, 또 개발자로 하여금 이에 큰 리소스를 들이지 않고 접근할 수 있도록 하기 위함입니다.

메인 스레드에서 수행하는 것이 부적절한 작업을 수행하려 할 때 Coroutines 를 활용하기 때문에, 대부분의 Coroutines 작업은 비동기 작업일 것입니다. 그러므로 각 작업이 수행되어야 할 스레드에 대한 정보가 필요할 것이며, 단순 계산 작업이 아니기 때문에 결과를 보장할 수 없으므로 예외 처리에 대한 욕구도 충족이 되어야 합니다.
또한, 이에 관한 정보들은 실질적인 Coroutines 작업의 실행을 담당하는 Continuation<T> 객체 외부에서 끊임없이 참조되기도 합니다. (uCont.context 또는 continuation.context 등을 IDE 내부에서 검색해 보시면 수많은 콜 사이트를 확인해 보실 수 있습니다.)
CoroutineScope
Creates a CoroutineScope that wraps the given coroutine context.
If the given context does not contain a Job element, then a default Job() is created. This way,
failure of any child coroutine in this scope or cancellation of the scope itself cancels
all the scope's children, just like inside coroutineScope block.
위는 CoroutineScope() 메서드의 주석입니다. 메서드의 파라미터로는 CoroutineContext 를 받을 수 있는데, Dispatchers 의 상수값 (IO, Main(immdediate), Default 등) 또는 다른 Job 등이 해당됩니다. Job 이 넘겨지는 경우에는 별도의 Job 이 추가 생성되지 않으며, 넘겨진 Job 에 할당된 CoroutineContext 를 그대로 이어받습니다.
val job = Job() + Dispatchers.IO

CoroutineScope(job).launch {
    println(currentCoroutineContext())
}.apply {
    invokeOnCompletion {
        println("CoroutineScope End.")
    }
}

// Console

[StandaloneCoroutine{Active}@7230ec8, Dispatchers.IO]
CoroutineScope End.
그러므로, 넘겨진 상위 Job 이 취소되면 해당 CoroutineScope 도 함께 취소됩니다.
val job = Job() + Dispatchers.IO

job.cancel()

CoroutineScope(job).launch {
    println(currentCoroutineContext())
}.apply {
    invokeOnCompletion {
        println("CoroutineScope End.")
    }
}

// Console

CoroutineScope End.
우리가 수행하려는 Coroutines 작업은 CoroutineContext 를 래핑하는 CoroutineScope 내에서 이루어져야 하는데, 이는 넘겨진 CoroutineContext 를 해당 CoroutineScope 가 캡슐화하기 때문입니다.
@Suppress("FunctionName")
public fun CoroutineScope(context: CoroutineContext): CoroutineScope =
    ContextScope(if (context[Job] != null) context else context + Job())
즉, 지정해 준 CoroutineContext 를 기반으로 Coroutines 작업을 수행할 수 있도록 하는 범위를 지정하는 인터페이스인 것입니다.
In Android
안드로이드 프로그래밍에서는 보통 lifecycleScope, viewModelScope 를 주로 사용하게 됩니다. 물론, 필요에 따라 직접 CoroutineScope 를 생성하고, 목적에 따라 적절한 CoroutineContext 를 파라미터로 넘겨주는 상황도 존재합니다만, 대부분의 경우는 앞서 말한 두 가지의 lifecycle-aware-coroutine-scope 를 사용하면 됩니다.
이를 활용하면, 개발자는 CoroutineScope 의 해제에 대한 별도의 조치 없이 메모리 릭 안전하게 Coroutines 작업을 수행할 수 있게 됩니다.
lifecycleScope
override fun onStateChanged(source: LifecycleOwner, event: Lifecycle.Event) {
    if (lifecycle.currentState <= Lifecycle.State.DESTROYED) {
        lifecycle.removeObserver(this)
        coroutineContext.cancel()
    }
}
Lifecycle.State 가 DESTROYED 인 경우, lifecycle 을 관찰하는 observer 를 제거하고 lifecycleScope 역시 취소합니다. lifecycleScope 내부에 SupervisorJob() 을 파라미터로 넘겨주는 CoroutineScope 만 없다면 안심할 수 있습니다. SupvisorScope { } 의 경우는 해당 사항이 없는데, 부모 CoroutineScope 가 취소될 때 SupervisorScope { } 역시 취소되기 때문입니다.
viewModelScope
private const val JOB_KEY = "androidx.lifecycle.ViewModelCoroutineScope.JOB_KEY"

/**
 * [CoroutineScope] tied to this [ViewModel].
 * This scope will be canceled when ViewModel will be cleared, i.e [ViewModel.onCleared] is called
 *
 * This scope is bound to
 * [Dispatchers.Main.immediate][kotlinx.coroutines.MainCoroutineDispatcher.immediate]
 */
public val ViewModel.viewModelScope: CoroutineScope
    get() {
        val scope: CoroutineScope? = this.getTag(JOB_KEY)
        if (scope != null) {
            return scope
        }
        return setTagIfAbsent(
            JOB_KEY,
            CloseableCoroutineScope(SupervisorJob() + Dispatchers.Main.immediate)
        )
    }

internal class CloseableCoroutineScope(context: CoroutineContext) : Closeable, CoroutineScope {
    override val coroutineContext: CoroutineContext = context

    override fun close() {
        coroutineContext.cancel()
    }
}
viewModelScope 의 구현인데요. ViewModel 이 onCleared() 될 때, viewModelScope 역시 취소된다고 주석에 작성되어 있습니다. 생성되는 CoroutineScope 에는 JOB_KEY 라는 상수값이 태그로 활용됩니다.
<T> T getTag(String key) {
    if (mBagOfTags == null) {
        return null;
    }
    synchronized (mBagOfTags) {
        return (T) mBagOfTags.get(key);
    }
}

private static void closeWithRuntimeException(Object obj) {
    if (obj instanceof Closeable) {
        try {
            ((Closeable) obj).close();
        } catch (IOException e) {
            throw new RuntimeException(e);
        }
    }
}
넘겨진 태그는 onCleared() 될 때 Closeable 의 close() 를 위해 사용됩니다.
이건 여담인데, 최근 받았던 코드 리뷰에서 두 lifecycle-aware-coroutine-scope 에는 모두 SupervisorJob() 이 할당되어 있기 때문에, 해당 스코프 내에는 supervisorScope { } 와 SupervisorJob() 을 사용할 필요가 없다는 피드백을 받았었는데요.
class VM : ViewModel() {
    private val exceptionHandler = CoroutineExceptionHandler { _, throwable ->
        println("ExcpetionHandled : $throwable")
    }

    init {
        viewModelScope.launch(exceptionHandler) {
            launch {
                repeat(5) {
                    println("child 1 : $it")
                }

                throw Exception("1")
            }

            launch {
                repeat(5) {
                    println("child 2 : $it")
                }

                throw Exception("2")
            }
        }.invokeOnCompletion {
            println("Completed By : $it")
        }
    }
}

// Console

child 1 : 0
child 1 : 1
child 1 : 2
child 1 : 3
child 1 : 4
ExcpetionHandled : java.lang.Exception: 1
Completed By : java.lang.Exception: 1
실제로 코드를 작성해보면 Exception 1 예외가 viewModelScope 로 전달되어 해당 스코프가 취소됨을 알 수 있습니다. 어찌 보면 당연한 것이, SupervisorJob() 은 해당 CoroutineScope 의 예외로 인한 취소가 부모에 전파되지 않기 위함이기 때문입니다. 즉, 두 lifecycle-aware-coroutine-scope 내에서도 별도의 예외처리를 수행하려면 SupervisorJob() 또는 supervisorScope { } 를 사용하여야 합니다.
즉, 다음과 같이 작성합니다.
class VM : ViewModel() {
    private val exceptionHandler = CoroutineExceptionHandler { _, throwable ->
        println("ExcpetionHandled : $throwable")
    }

    init {
        viewModelScope.launch(exceptionHandler) {
            launch(SupervisorJob()) {
                repeat(5) {
                    println("child 1 : $it")
                }

                throw Exception("1")
            }

            launch(SupervisorJob()) {
                repeat(5) {
                    println("child 2 : $it")
                }

                throw Exception("2")
            }
        }.invokeOnCompletion {
            println("Completed By : $it")
        }
    }
}

// Console

child 1 : 0
child 1 : 1
child 1 : 2
child 1 : 3
child 1 : 4
ExcpetionHandled : java.lang.Exception: 1
child 2 : 0
child 2 : 1
child 2 : 2
child 2 : 3
child 2 : 4
ExcpetionHandled : java.lang.Exception: 2
Completed By : null
CoroutineDispatcher
CoroutineDispatcher 에 관해서는 이전에도 다룬 적이 있습니다. 당시에는 꽤 자세히 작성했다고 생각했는데, 지금 다시 보니 딱히 그렇지도 않은 것 같아서 추가로 학습하고 기록하고자 합니다.
public abstract class CoroutineDispatcher :
    AbstractCoroutineContextElement(ContinuationInterceptor), ContinuationInterceptor {
	...
}
CoroutineDispatcher 의 명세입니다. 추상 클래스인 AbstractCoroutineContextElement 를 구현하고 있는데, 이는 결국 앞서 기술했던 CoroutineContext 를 구현하는 Element 를 상속받는 인터페이스라, CoroutineContext 에 해당합니다. 그래서 CoroutineScope 를 시작하고자 할 때 파라미터로 Dispatcher 를 넘겨줄 수 있는 것이고요. DIP 를 철저히 지키는 구조로 구현되어 있어, Coroutines 관련 작업에 관한 코드를 작성할 때에 대단한 유연성을 가집니다.
CoroutineDispatcher 는 작업을 특정 스레드로 할당하는 역할을 수행합니다. 그렇다면 어떠한 방식으로 이러한 작업을 수행할 수 있는 걸까요? 가장 자주 사용되는 Dispatchers.IO 의 내부 구현을 살펴보며 그 답을 알아보고자 합니다.
Dispatchers.IO 는 DefaultIoScheduler 타입이므로, 해당 타입의 구현을 살펴봅니다.
internal object DefaultIoScheduler : ExecutorCoroutineDispatcher(), Executor {
	...
}
명세는 위와 같습니다. ExecutorCoroutineDispatcher(), Executor 를 상속받는 형태인데, 전자는 executor 와 close() 메서드를 캡슐화할 수 있도록 하며, 후자는 close() 메서드에 대한 재정의를 강제하도록 하기 위함입니다.
해당 object 가 갖는 메서드 중, 우리가 주목해야 할 것은 dispatch() 메서드입니다. 파라미터로 Dispatcher.IO 를 넘기는 CoroutineScope 를 생성한 뒤, dispatch() 메서드에 브레이크 포인트를 찍어주었고, 다음과 같은 결과를 얻을 수 있었습니다
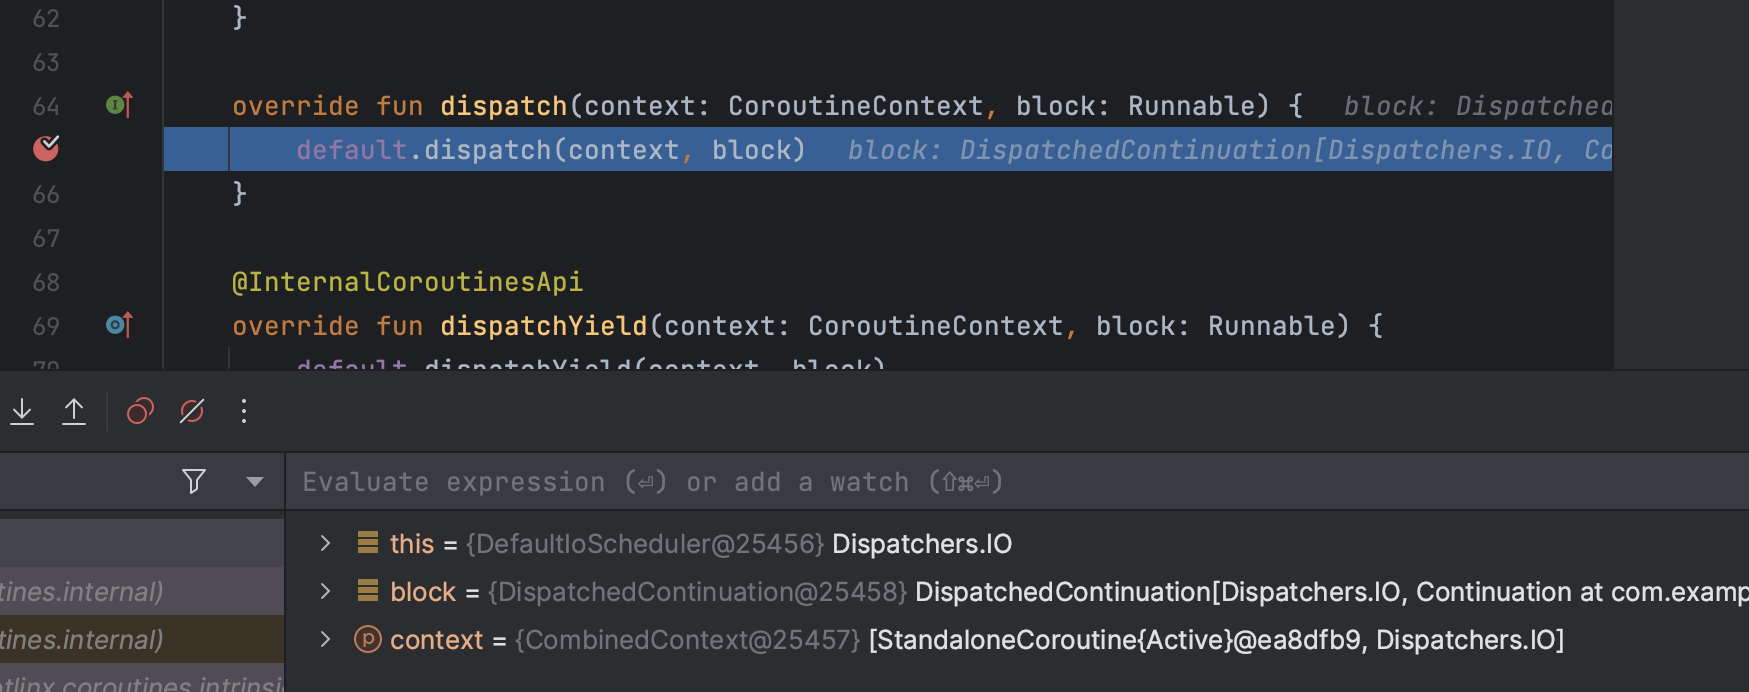
dispatch() 가 호출되었고, 해당 메서드의 block 파라미터로 넘어오는 값의 타입은 Runnable 입니다. 디버그 툴을 확인해 보면 DispatchedContinuation 이 넘겨지는 사실을 알 수 있는데, 이는 Runnable -> Task -> SchedulerTask -> DispatchedTask -> DispatchedContinuation 순서로 상속 관계가 이루어져 있기 때문에 DispatchedContinuation 을 넘겨줄 수 있습니다.
어쨌든, dispatch() 메서드의 선언을 살펴봅니다.
/**
 * Requests execution of a runnable [block].
 * The dispatcher guarantees that [block] will eventually execute, typically by dispatching it to a thread pool,
 * using a dedicated thread, or just executing the block in place.
 * The [context] parameter represents the context of the coroutine that is being dispatched,
 * or [EmptyCoroutineContext] if a non-coroutine-specific [Runnable] is dispatched instead.
 * Implementations may use [context] for additional context-specific information,
 * such as priority, whether the dispatched coroutine can be invoked in place,
 * coroutine name, and additional diagnostic elements.
 *
 * This method should guarantee that the given [block] will be eventually invoked,
 * otherwise the system may reach a deadlock state and never leave it.
 * The cancellation mechanism is transparent for [CoroutineDispatcher] and is managed by [block] internals.
 *
 * This method should generally be exception-safe. An exception thrown from this method
 * may leave the coroutines that use this dispatcher in an inconsistent and hard-to-debug state.
 *
 * This method must not immediately call [block]. Doing so may result in `StackOverflowError`
 * when `dispatch` is invoked repeatedly, for example when [yield] is called in a loop.
 * In order to execute a block in place, it is required to return `false` from [isDispatchNeeded]
 * and delegate the `dispatch` implementation to `Dispatchers.Unconfined.dispatch` in such cases.
 * To support this, the coroutines machinery ensures in-place execution and forms an event-loop to
 * avoid unbound recursion.
 *
 * @see isDispatchNeeded
 * @see Dispatchers.Unconfined
 */
public abstract fun dispatch(context: CoroutineContext, block: Runnable)
주석이 꽤 긴데, 주목할만한 부분은 상단부입니다. dispatch() 메서드가 스레드 풀에 Runnable 객체를 전달하여 실행될 수 있도록 합니다.
Dispatchers.IO 에서는 default 라는 변수의 dispatch() 메서드를 호출하고 있으므로, 해당 변수에 대해 파악할 필요가 있어 보입니다.
해당 변수는 UnlimitedIoScheduler.limitedParallelsm() 을 통해 생성되며, 해당 함수 내에서 LimitedDispatcher 를 반환합니다. 다만, 해당 클래스의 파라미터로 UnlimitedIoScheduler 를 다시 넘기기 때문에, 최종적으로 우리는 UnlimitedIoScheduler 의 dispatch() 메서드를 확인하면 됩니다.
/**
     * Dispatches execution of a runnable [block] with a hint to a scheduler whether
     * this [block] may execute blocking operations (IO, system calls, locking primitives etc.)
     *
     * [taskContext] -- concurrency context of given [block].
     * [tailDispatch] -- whether this [dispatch] call is the last action the (presumably) worker thread does in its current task.
     * If `true`, then  the task will be dispatched in a FIFO manner and no additional workers will be requested,
     * but only if the current thread is a corresponding worker thread.
     * Note that caller cannot be ensured that it is being executed on worker thread for the following reasons:
     *   * [CoroutineStart.UNDISPATCHED]
     *   * Concurrent [close] that effectively shutdowns the worker thread
     */
    fun dispatch(block: Runnable, taskContext: TaskContext = NonBlockingContext, tailDispatch: Boolean = false) {
        trackTask() // this is needed for virtual time support
        val task = createTask(block, taskContext)
        // try to submit the task to the local queue and act depending on the result
        val currentWorker = currentWorker()
        val notAdded = currentWorker.submitToLocalQueue(task, tailDispatch)
        if (notAdded != null) {
            if (!addToGlobalQueue(notAdded)) {
                // Global queue is closed in the last step of close/shutdown -- no more tasks should be accepted
                throw RejectedExecutionException("$schedulerName was terminated")
            }
        }
        val skipUnpark = tailDispatch && currentWorker != null
        // Checking 'task' instead of 'notAdded' is completely okay
        if (task.mode == TASK_NON_BLOCKING) {
            if (skipUnpark) return
            signalCpuWork()
        } else {
            // Increment blocking tasks anyway
            signalBlockingWork(skipUnpark = skipUnpark)
        }
    }
이 역시 주석이 조금 긴데, Runnable 블럭을 스케줄러에 전달한다는 사실만 파악하면 됩니다.
해당 메서드에서 확인해야 하는 부분은 createTask() 메서드와 currentWorker.submitToLocalQueue() 입니다.
createTask()
fun createTask(block: Runnable, taskContext: TaskContext): Task {
    val nanoTime = schedulerTimeSource.nanoTime()
    if (block is Task) {
        block.submissionTime = nanoTime
        block.taskContext = taskContext
        return block
    }
    return TaskImpl(block, nanoTime, taskContext)
}
해당 메서드의 파라미터는 Runnable 과 TaskContext 이며, Task 를 반환 타입으로 갖습니다. 다만, 반환되는 실질적인 타입은 TaskImpl 이며, 해당 클래스 내에는 실질적으로 Runnable 객체를 실행하는 메서드가 있습니다.
override fun run() {
    try {
        block.run()
    } finally {
        taskContext.afterTask()
    }
}
Worker.submitToLocalQueue()
private fun Worker?.submitToLocalQueue(task: Task, tailDispatch: Boolean): Task? {
    if (this == null) return task
    /*
     * This worker could have been already terminated from this thread by close/shutdown and it should not
     * accept any more tasks into its local queue.
     */
    if (state === WorkerState.TERMINATED) return task
    // Do not add CPU tasks in local queue if we are not able to execute it
    if (task.mode == TASK_NON_BLOCKING && state === WorkerState.BLOCKING) {
        return task
    }
    mayHaveLocalTasks = true
    return localQueue.add(task, fair = tailDispatch)
}
createTask() 메서드를 통해 생성된 Task 는 해당 메서드에 의해 localQueue 에 삽입됩니다. localQueue 는 WorkQueue 타입의 Worker 클래스 프로퍼티이며, Worker 클래스는 dispatch() 메서드 선언에 있던 currentWorker() 메서드를 통해 반환됩니다. Worker 는 워커 스레드를 의미하며, Worker 클래스의 executeTask() 메서드에 의해 실질적으로 워커 스레드에서 Runnable 을 실행하는 형태를 갖고 있습니다.
internal inner class Worker private constructor() : Thread() {
	...
	@JvmField
	val localQueue: WorkQueue = WorkQueue()
    ...

	override fun run() = runWorker()
    ...

	private fun runWorker() {
    	...
		executeTask(task)
        ...
    }
    ...

	private fun executeTask(task: Task) {
        val taskMode = task.mode
        idleReset(taskMode)
        beforeTask(taskMode)
        runSafely(task)
        afterTask(taskMode)
    }
    ...

    fun runSafely(task: Task) {
        try {
            task.run()
        } catch (e: Throwable) {
            val thread = Thread.currentThread()
            thread.uncaughtExceptionHandler.uncaughtException(thread, e)
        } finally {
            unTrackTask()
        }
    }
    ...
}
위 코드 블럭 하단의 try { task.run } 이 실질적으로 Task 클래스의 run() 메서드를 실행합니다.
전체 과정을 간략하게 정리하자면 다음과 같습니다.
- Dispatcher 를 설정하면, 해당 Dispatcher 의 dispatch() 메서드를 실행
- 내부적으로 Scheduler 의 dispatch() 메서드를 실행하여 스레드 풀에 Runnable 객체 전달
- Runnable 객체를 활용하여 Task 객체 생성
- localQueue 에 삽입
- 유휴 스레드에 Task 할당되어 실행
Continuation<T>
Continuation<T> 에 대해서는 다음 포스트에서 자세히 설명한 바 있습니다.
StateMachine 과 Stackless Coroutine
Coroutine Coroutine(코루틴) 은 비선점형 멀티태스킹 솔루션입니다. 동시성 프로그래밍을 구현하기 위한 기법으로, Kotlin 은 언어차원에서 제공합니다. 코루틴에 관한 설명은 다음 포스트에 자세히
blothhundr.tistory.com
제가 궁금했던 것은, 'Continuation<T> 는 어떤 과정으로 생성되는가' 였습니다. 이를 파악하기 위해 브레이크 포인트를 등록해 봤고, 그 결과 createCoroutineUnintercepted() 메서드에 의해 생성됨을 파악할 수 있었습니다.
@SinceKotlin("1.3")
@Suppress("UNCHECKED_CAST")
public fun <R, T> (suspend R.() -> T).startCoroutine(
    receiver: R,
    completion: Continuation<T>
) {
    createCoroutineUnintercepted(receiver, completion).intercepted().resume(Unit)
}
해당 메서드를 통해 Continuation<T> 객체를 획득한 뒤, 즉각적으로 intercepted() 와 resume() 메서드가 호출되는데, 이에 대해서는 ContinuationInterceptor 에 관한 지식이 있어야 파악이 가능합니다.
ContinuationInterceptor
Continuation<T>.intercepted() 는 생성된 Continuation<T> 를 즉각적으로 중단시킵니다.
public fun intercepted(): Continuation<Any?> =
    intercepted
        ?: (context[ContinuationInterceptor]?.interceptContinuation(this) ?: this)
            .also { intercepted = it }
위 스니펫을 보면 ContinuationInterceptor.Key 를 통해 CoroutineContext 로부터
ContinuationInterceptor 를 획득합니다. ContinuationInterceptor 는 CoroutineScope 를 생성할 때 파라미터로 넘겨주는 여러 CoroutineContext 중 CoroutineDispatcher 가 이에 해당합니다.
public abstract class CoroutineDispatcher :
    AbstractCoroutineContextElement(ContinuationInterceptor), ContinuationInterceptor {
	    ...
}
위 스니펫에서 확인할 수 있듯, 추상 클래스로 선언된 CoroutineDispatcher 가 ContinuationInterceptor 의 서브 타입이기 때문입니다. 즉, CoroutineDispatcher 의 또 다른 형태 정도로 보면 될 것 같습니다.
획득한 ContinuationInterceptor 의 interceptContinuation() 메서드를 실행하고 있으니, CoroutineDispatcher 의 interceptContinuation() 메서드를 살펴보면 되겠습니다.
public final override fun <T> interceptContinuation(continuation: Continuation<T>): Continuation<T> =
    DispatchedContinuation(this, continuation)
DispatchedContinuation 객체를 반환합니다. CoroutineDispatcher 의 dispatch() 메서드에 block 이라는 파라미터 이름으로 넘겨졌던 그 타입입니다.
DispatchedContinuation 타입의 resume() 을 호출하는데, 이는 resumeWith() 를 호출하게 되므로
resumeWith() 메서드의 명세를 살펴봅니다.
override fun resumeWith(result: Result<T>) {
    val context = continuation.context
    val state = result.toState()
    if (dispatcher.isDispatchNeeded(context)) {
        _state = state
        resumeMode = MODE_ATOMIC
        dispatcher.dispatch(context, this)
    } else {
        executeUnconfined(state, MODE_ATOMIC) {
            withCoroutineContext(this.context, countOrElement) {
                continuation.resumeWith(result)
            }
        }
    }
}
isDispatchNeeded() 메서드는 스레드 전환 요구 여부를 판단하는 메서드입니다. 전환이 요구되는 경우, 주어진 CoroutineContext 에 따라 dispatch() 해줍니다.
앞선 CoroutineDispatcher 파트에서 언급했던 dispatch() 및 이후의 과정들에 대한 설명은, 생성된 Coroutines 작업을 ContinuationInterceptor 가 최초로 중지시킨 뒤 dispatch() 메서드를 실행하도록 결정하는 작업 이후의 과정이었던 것입니다.
추가로, ContinuationInterceptor 에는 중단된 Continuation<T> 를 release() 해주는 메서드도 작성되어 있습니다.
fun release() {
    awaitReusability()
    reusableCancellableContinuation?.detachChild()
}
release() 에서는 주어진 Continuation 객체가 재개되어야 하는지에 대해 동기적으로 루프를 돌며 확인합니다. Continuation 객체가 재사용할 수 있는, 또는 재사용 중인 상태가 아니라면 루프에서 탈출하고 바로 다음 라인을 실행합니다. 아니라면 자동으로 발생하는 CancellationException 을 연기하면서 취소되지 않도록 유지하고요.
Continuation 에 대한 더 이상의 재개가 필요없다면, detachChild() 메서드는 Continuation 이 GC 에 의해 수집될 수 있도록 메모리에서 해제하는 역할을 수행합니다.
즉, ContinuationInterceptor 는 Continuation 의 중단이 필요한 경우 중단, 재개가 필요한 경우 재개시키는 작업을 담당함을 알 수 있습니다.
Coroutines 작업의 생성과 생성 시 요구되는 객체들의 역할, 내부 구조와 상호작용에 대해 다소 상세히 알아보았습니다.
CoroutineScope(Dispatchers.IO + coroutineExceptionHandler).laucnch {
	...
}
이제까지 설명했던 것들은 launch { } 앞까지의 코드를 작성함으로 전개되는 것들인 셈입니다. 이후로 설명하게 될 것들은 launch { } 를 포함한, 실질적 Coroutines 작업과 각종 메서드들의 실행으로 인한 상호작용이 될 것이고요.
Job
Job 은 Coroutines 에서 가장 기본적인 형태의 작업을 의미합니다. 나름의 생명 주기를 가지며, 언제든 모종의 이유로(개발자가 의도하였든, 그렇지 않았든) 취소될 수 있습니다.
기본적으로 부모-자식 관계를 규명할 수 있기 때문에, 당연스럽게도 부모가 취소되면 자식 Job 도 재귀적으로 취소됩니다.
단, 이러한 형태의 구조를 원치 않을 경우, SupervisorJob() 또는 supervisorScope { } 를 통해 회피하여 구현할 수 있습니다. 이에 대해서는 다음 포스트에 자세히 작성해두었으니, 참고하시면 되겠습니다.
Coroutine Details
지극히 개인적인 생각들 Kotlin 을 독학하고 사용한 지 1년이 조금 넘는 기간 동안, 수없이 많은 코루틴 코드를 작성해왔습니다. 처음에는 단순히 비동기 처리를 위한 수단으로만 사용하였고, 코
blothhundr.tistory.com
Job 은 비동기로 동작할 수 있지만, 어떠한 값을 반환하는 형태는 아닙니다. Job 이 데이터 홀더 클래스도 아니고, 타입 파라미터를 요구하는 제네릭 타입의 클래스도 아니니까요. 값을 반환하는 경우에 대해서는 이 다음의 Deferred<T> 에서 설명합니다.
앞서 설명하였듯, Job 은 나름의 생명 주기를 갖는데요. 이는 State 로 표현되며, 다음과 같습니다.
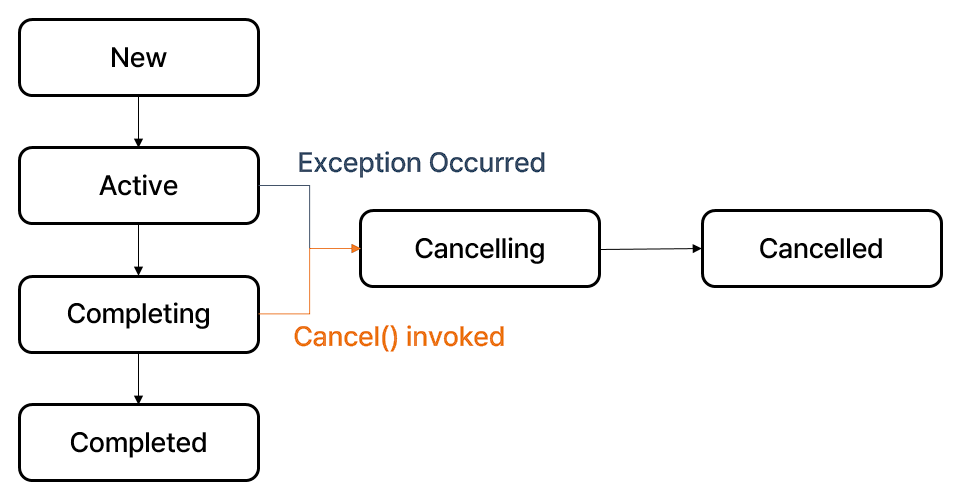
각 State 에 대해 확인하는 메서드가 존재하며(isActive(), isComplete(), isCancelled()), 개발자가 직접 사용하여도 좋고, 내부적으로도 자주 사용되고 있습니다. 재미있는 점은, 위 그림의 경우 모든 Job 이 New 로 시작하는 것처럼 제작하였지만, 실제로 대부분의 경우에는 Active 에서 시작한다는 점입니다. New 로 시작하는 방법도 있는데, 실질적으로 Job 객체를 생성하는 launch { } 메서드의 구현을 살펴보면 쉽게 파악할 수 있습니다.
public fun CoroutineScope.launch(
    context: CoroutineContext = EmptyCoroutineContext,
    start: CoroutineStart = CoroutineStart.DEFAULT,
    block: suspend CoroutineScope.() -> Unit
): Job {
    val newContext = newCoroutineContext(context)
    val coroutine = if (start.isLazy)
        LazyStandaloneCoroutine(newContext, block) else
        StandaloneCoroutine(newContext, active = true)
    coroutine.start(start, coroutine, block)
    return coroutine
}
두 번째 파라미터인 start 를 CoroutineStart.LAZY 로 설정하면 New 에서 시작하고, 해당 Job 객체의 start() 메서드를 실행하면 Active 상태로 전환됩니다.
이후의 구현도 한 번 살펴볼까요. 지역 변수인 coroutine 은 넘겨진 start 파라미터의 값에 따라 서로 다른 타입의 객체가 할당됩니다. 이후 start() 메서드가 호출됩니다.
@InternalCoroutinesApi
public operator fun <T> invoke(block: suspend () -> T, completion: Continuation<T>): Unit =
    when (this) {
        DEFAULT -> block.startCoroutineCancellable(completion)
        ATOMIC -> block.startCoroutine(completion)
        UNDISPATCHED -> block.startCoroutineUndispatched(completion)
        LAZY -> Unit // will start lazily
    }
CoroutineStart.LAZY 의 경우, 해당 Job 을 start() 해줄 때까지 실행되지 않아야 하기 때문에 Unit 을 반환합니다. 기본값이 DEFAULT 이기 때문에, DEFAULT 의 경우를 살펴보면 되겠습니다.
@InternalCoroutinesApi
public fun <T> (suspend () -> T).startCoroutineCancellable(completion: Continuation<T>): Unit = runSafely(completion) {
    createCoroutineUnintercepted(completion).intercepted().resumeCancellableWith(Result.success(Unit))
}
익숙한 메서드가 눈에 밟힙니다. 등장하는 대부분의 메서드와 타입들은 Continuation<T>, CoroutineDispatcher 파트에서 한 번 쯤은 등장했었는데요. 이는 곧, Coroutines 작업들은 Continuation<T> 와 CoroutineContext 의 협력 및 이들에 대한 참조로 이루어진다는 사실을 알 수 있습니다.
즉, Coroutines 에서의 Job 은 CoroutineScope 를 통해 생성되는 작업 그 자체를 의미하고, 이는 소스 코드가 빌드될 때 Coroutines 내부 구현에 의해 Continuation<T> 로 변경되어 진행됩니다.
Deferred<T>
앞서 설명하였듯, Deferred<T> 는 Coroutines 작업을 통해 특정한 값을 반환받을 수 있습니다. suspend 키워드와 반환 타입이 지정된 메서드를 그냥 실행하는 것은, CoroutineScope 내에서 직렬적으로 실행되기 때문에 동시에 추가적인 작업을 수행하지는 않습니다. Deferred<T> 는 CoroutineScope 내에서 작업을 병행적으로 실행하기 때문에, 해당 작업을 수행하면서도 또 다른 작업을 함께 수행할 수 있습니다.
public interface Deferred<out T> : Job {
	...
}
명세는 위와 같은데, 기본적으로 Job 의 서브 타입이기 때문에 Job 의 구현과 거의 같습니다. 차이로는 await() 메서드가 존재한다는 것인데, Job 과는 다르게 결과의 반환을 대기하여야 하기 때문입니다.
Deferred<T> 의 객체 생성은 async { } 메서드를 사용하여 가능한데요. 명세는 launch { } 와 두 줄 빼고 모두 같고, 반환 타입만 다릅니다.
public fun <T> CoroutineScope.async(
    context: CoroutineContext = EmptyCoroutineContext,
    start: CoroutineStart = CoroutineStart.DEFAULT,
    block: suspend CoroutineScope.() -> T
): Deferred<T> {
    val newContext = newCoroutineContext(context)
    val coroutine = if (start.isLazy)
        LazyDeferredCoroutine(newContext, block) else
        DeferredCoroutine<T>(newContext, active = true)
    coroutine.start(start, coroutine, block)
    return coroutine
}

//

public fun CoroutineScope.launch(
    context: CoroutineContext = EmptyCoroutineContext,
    start: CoroutineStart = CoroutineStart.DEFAULT,
    block: suspend CoroutineScope.() -> Unit
): Job {
    val newContext = newCoroutineContext(context)
    val coroutine = if (start.isLazy)
        LazyStandaloneCoroutine(newContext, block) else
        StandaloneCoroutine(newContext, active = true)
    coroutine.start(start, coroutine, block)
    return coroutine
}
서로 다른 두 줄은, 반환 타입이 다르기 때문에 지역 변수 coroutine 에 할당되는 타입이 다릅니다.async { } 메서드를 통해 Deferred<T> 객체를 생성한다면 보통 DeferredCoroutine<T> 가 반환됩니다. DeferredCoroutine<T> 는 Deferred<T> 의 서브 타입이므로 await() 메서드를 정의하고 있으며, 이는 awaitInternal() 메서드를 호출합니다.
internal suspend fun awaitInternal(): Any? {
    // fast-path -- check state (avoid extra object creation)
    while (true) { // lock-free loop on state
        val state = this.state
        if (state !is Incomplete) {
            // already complete -- just return result
            if (state is CompletedExceptionally) { // Slow path to recover stacktrace
                recoverAndThrow(state.cause)
            }
            return state.unboxState()

        }
        if (startInternal(state) >= 0) break // break unless needs to retry
    }
    return awaitSuspend() // slow-path
}
이미 완료된 작업이라면 unboxState() 메서드를 통해 결과값을 반환하고, 그렇지 않은 경우 루프를 탈출하여 awaitSuspend() 를 반환합니다. awaitSuspend() 는 suspendCoroutineUnintnerceptedOrReturn 의 실행으로 이어지고요.
이후로는 앞서 알 수 있었던 것처럼, Continuation<T> 와 CoroutineContext 의 협력으로 작업을 수행합니다. CompletedContinuation 객체를 생성하고, 해당 객체의 result 프로퍼티에 값을 담아 완료합니다.
한 번 완료된 Deferred<T> 는 getCompleted() 메서드를 통해 담겨진 result 에 접근할 수 있는데요.
internal fun getCompletedInternal(): Any? {
    val state = this.state
    check(state !is Incomplete) { "This job has not completed yet" }
    if (state is CompletedExceptionally) throw state.cause
    return state.unboxState()
}
앞서 awaitInternal() 에서 그랬던 것처럼 unboxState() 를 통해 값에 접근합니다.
Coroutines 는 보다 쉽고 간편한 비동기 처리를 위해 사용됩니다. 처음 안드로이드 프로그래밍을 접했을 때 시도했던 AsyncTask 와는 비교도 안 될 만큼 간편하다고 느끼는데, 그러면서도 내부적으로 어떻게 코드가 진행되는지 제대로 알아 본 기억이 거의 없어서 이번 기회에 한 번 마음 먹고 정리해보았습니다. 포스트를 잘 작성하고자 노력했는데, 그 노력이 고스란히 배움으로 남아서 다행이라고 생각합니다.
'Kotlin' 카테고리의 다른 글
| Effective Kotlin, 좋았던 부분들. (0) | 2023.11.04 |
|---|---|
| Flow Cancellation (feat. Exception Handling) (0) | 2023.09.24 |
| Coroutine Details (0) | 2023.06.22 |
| Kotlin Closure (0) | 2023.05.04 |
| Generics 와 Reified 키워드 (0) | 2023.04.21 |


