
동기
수많은 안드로이드 이미지 처리 라이브러리가 있습니다. 그 중 가장 선호되는 것은 당연히 Glide 와 Coil 일 겁니다. Fresco, Picasso 등이 있지만, 현재는 그다지 많이 사용되진 않는 것 같아요.
프로젝트를 위해 기술 논의를 하던 중, Glide 와 Coil 을 두고 깊이 고민하였습니다. 결국엔 Coil 을 선택하였고요. 가장 주된 이유는 Jetpack Compose 와 통합이 잘 되기 때문이었습니다. (Glide 를 이용하면 작은 처리에도 더욱 많은 코드가 필요합니다.)
Glide 와 Coil 에 대해 비교한 포스트는 작성해두었으니, 참고하시면 되겠습니다.
[Jetpack Compose] Glide 와 Coil, 무엇을 사용하면 좋을까.
이미지 처리 라이브러리 개발시, 저는 UI에 관련된 라이브러리는 최대한 사용하지 않으려고 하는 편입니다. 어쨌든 라이브러리도 사람이 만드는 것이고, 자세히 파고들면 그다지 어려운 개념이
blothhundr.tistory.com
Coil 이 선택되었지만, 문득 각 라이브러리가 어떻게 이미지를 불러오는지에 대해 궁금함이 생겼습니다. 이에 관해 학습하고 포스팅합니다.
먼저, Glide
Glide 에서는 load() 메서드를 통해 소스를 전달하니, 가장 먼저 load() 메서드를 살펴보면 좋겠지요.
public RequestBuilder<TranscodeType> load(@Nullable String string) {
  return loadGeneric(string);
}
해당 메서드의 반환 타입은 RequestBuilder<T> 입니다. 맞습니다. Glide 에서는 RequestBuilder<T> 가 이미지를 요청합니다. 다만, 실질적인 요청의 시작은 load() 가 아닌 into() 에서 이루어지는데요.
private <Y extends Target<TranscodeType>> Y into(
      @NonNull Y target,
      @Nullable RequestListener<TranscodeType> targetListener,
      BaseRequestOptions<?> options,
      Executor callbackExecutor) {
    Preconditions.checkNotNull(target);
    if (!isModelSet) {
      throw new IllegalArgumentException("You must call #load() before calling #into()");
    }

    Request request = buildRequest(target, targetListener, options, callbackExecutor);

    Request previous = target.getRequest();
    if (request.isEquivalentTo(previous)
        && !isSkipMemoryCacheWithCompletePreviousRequest(options, previous)) {
      // If the request is completed, beginning again will ensure the result is re-delivered,
      // triggering RequestListeners and Targets. If the request is failed, beginning again will
      // restart the request, giving it another chance to complete. If the request is already
      // running, we can let it continue running without interruption.
      if (!Preconditions.checkNotNull(previous).isRunning()) {
        // Use the previous request rather than the new one to allow for optimizations like skipping
        // setting placeholders, tracking and un-tracking Targets, and obtaining View dimensions
        // that are done in the individual Request.
        previous.begin();
      }
      return target;
    }

    requestManager.clear(target);
    target.setRequest(request);
    requestManager.track(target, request);

    return target;
  }
하단의 target.setRequest() 메서드에서 생성된 Request 구현체를 target 에 할당합니다. target 은 때에 따라 다른데, 보통은 ImageView 와 같은 View 일 것입니다. Target 에는 다양한 종류가 있는데요. ViewTarget, CustomViewTarget, SimpleTarget 등이 있습니다만, 해당 포스트에서는 View 에 직접 삽입하는 케이스만을 이야기합니다.
변수 request 의 타입 Request 는 인터페이스이고, 주로 사용되는 Request 구현체는 SingleRequest 입니다.
SingleRequest 의 onSizeReady() 콜백 메서드가 호출될 때, Glide 의 Engine 클래스가 이미지 로딩을 시작합니다.
Starts a load for the given arguments.
Must be called on the main thread.
The flow for any request is as follows:
Check the current set of actively used resources, return the active resource if present, and move any newly inactive resources into the memory cache.
Check the memory cache and provide the cached resource if present.
Check the current set of in progress loads and add the cb to the in progress load if one is present.
Start a new load.
캐싱 정책에 따라 작동하도록 구현되어 있음을 알 수 있습니다. Glide 의 캐시와 관련해서는 다음 포스트에 자세히 작성해 두었으니, 참고하시면 좋을 것 같습니다.
[Glide] Glide 의 Cache
Glide 사용하고 계신가요? 안드로이드 개발자들이 가장 사랑하는 이미지 처리 라이브러리입니다. 저 또한 애용 중이며, 많은 분들께서 사용 중이시리라 생각합니다. 수많은 메서드를 통해 이미지
blothhundr.tistory.com
EngineResource<?> memoryResource;
synchronized (this) {
  memoryResource = loadFromMemory(key, isMemoryCacheable, startTime);

  if (memoryResource == null) {
    return waitForExistingOrStartNewJob(
        glideContext,
        model,
        signature,
        width,
        height,
        resourceClass,
        transcodeClass,
        priority,
        diskCacheStrategy,
        transformations,
        isTransformationRequired,
        isScaleOnlyOrNoTransform,
        options,
        isMemoryCacheable,
        useUnlimitedSourceExecutorPool,
        useAnimationPool,
        onlyRetrieveFromCache,
        cb,
        callbackExecutor,
        key,
        startTime);
  }
}
요청하는 리소스가 메모리에 캐시되었는지 확인하고, 없으면 waitForExistingOrStartnewJob() 메서드를 실행합니다. 현재 수행 중인 EngineJob 이 있으면 재시도임을 확인한 뒤 콜백을 추가하고, 그렇지 않은 경우에는 새로운 EngineJob 을 실행하도록 합니다.
EngineJob 은 이미지 로딩에 대한 콜백을 추가하거나 제거하고, 로드가 완료되면 콜백을 알리는 방식으로 로드를 관리하는 클래스입니다. 물론, 실제로 이미지 로딩을 수행하는 부분이기도 합니다.
public synchronized void start(DecodeJob<R> decodeJob) {
  this.decodeJob = decodeJob;
  GlideExecutor executor =
      decodeJob.willDecodeFromCache() ? diskCacheExecutor : getActiveSourceExecutor();
  executor.execute(decodeJob);
}
executor 만 봐도 감이 옵니다. 내부에는 delegate 를 통해 생성을 위임한 Executor 가 있고, 해당 Executor 는 Runnable 객체를 받아 처리합니다. 즉, 백그라운드 스레드에서 처리합니다.
캐시에서 처리할 수 있다면 discCacheExecutor 를 사용하고, 그렇지 않다면 (새로 얻어와야 한다면) getActiveSourceExecutor() 를 통해 새롭게 이미지를 얻어 옵니다.
willDecodeFromCache() 메서드도 재미있는데, 해당 메서드 내부에서 실행하는 getNextStage() 메서드에 전체 캐시 전략에 따라 이미지를 얻어 오는 과정이 한 눈에 들어오도록 작성되어 있습니다.
private Stage getNextStage(Stage current) {
  switch (current) {
    case INITIALIZE:
      return diskCacheStrategy.decodeCachedResource()
          ? Stage.RESOURCE_CACHE
          : getNextStage(Stage.RESOURCE_CACHE);
    case RESOURCE_CACHE:
      return diskCacheStrategy.decodeCachedData()
          ? Stage.DATA_CACHE
          : getNextStage(Stage.DATA_CACHE);
    case DATA_CACHE:
      // Skip loading from source if the user opted to only retrieve the resource from cache.
      return onlyRetrieveFromCache ? Stage.FINISHED : Stage.SOURCE;
    case SOURCE:
    case FINISHED:
      return Stage.FINISHED;
    default:
      throw new IllegalArgumentException("Unrecognized stage: " + current);
  }
}
넘겨진 current 인자에 따라 동작합니다. 리소스나 디스크에 캐시되어 있으면 그대로 true 반환되어 이를 활용하고, 그렇지 않으면 false 를 반환시켜 getActiveSourceExecutor() 를 사용하게 됩니다.
즉, DecodeJob 의 상태에 따라 서로 다른 Executor 에 의해 상황에 맞도록(캐시된 이미지 또는 원본 소스로부터) 백그라운드 스레드를 활용, 이미지를 가져옵니다.
네트워크를 통해 이미지를 획득하는 과정에는 HttpUrlFetcher 라는 클래스가 사용됩니다. Glide 는 통신을 위해 ModelLoader 라는 인터페이스의 구현체를 활용하는데, 그 구현체가 정말 다양합니다.
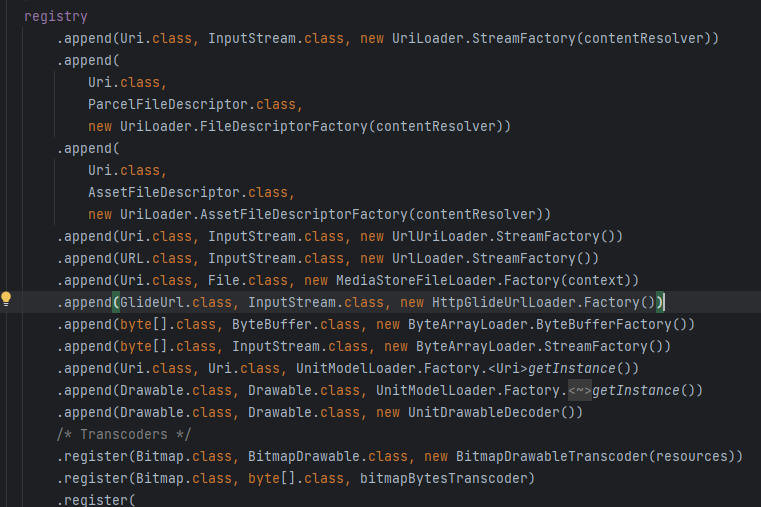
다양한 ModelLoader 들이 존재하지만, 눈여겨 보아야 할 것은 HttpGlideUrlLoader 일 것입니다. 해당 클래스 내의 buildLoadData() 메서드의 반환 값인 LoadData<T> 의 생성자 파라미터에 HttpUrlFetcher 클래스 인스턴스가 포함됩니다.
private InputStream getStreamForSuccessfulRequest(HttpURLConnection urlConnection) throws HttpException {
    try {
        if (TextUtils.isEmpty(urlConnection.getContentEncoding())) {
            int contentLength = urlConnection.getContentLength();
            stream = ContentLengthInputStream.obtain(urlConnection.getInputStream(), contentLength);
        } else {
            if (Log.isLoggable(TAG, Log.DEBUG)) {
            Log.d(TAG, "Got non empty content encoding: " + urlConnection.getContentEncoding());
        }
        stream = urlConnection.getInputStream();
        }
    } catch (IOException e) {
        throw new HttpException(
            "Failed to obtain InputStream", getHttpStatusCodeOrInvalid(urlConnection), e);
        }
    return stream;
}
내부적으로는 HttpUrlConnection 이 사용됩니다. 이렇게 획득한 InputStream 은 이후 콜백 메서드인 onDataReady() 메서드의 파라미터로 포함되어 콜백으로 전달됩니다. 이후엔 DecodeJob 에 의해 처리되고요.
Coil
AsyncImage(
    model = imageUrl,
    contentDescription = contentDescription
)
Coil 로 이미지를 처리하려는 경우, 보통 위와 같이 작성할 수 있습니다. 추가로 다른 구현이 필요하다면 Slot API 를 통해 구현할 수 있게 되어 있고요.
Coil 은 통신을 위해 Fetcher 클래스를 이용합니다.
fun interface Fetcher {

    suspend fun fetch(): FetchResult?

    fun interface Factory<T : Any> {

        fun create(data: T, options: Options, imageLoader: ImageLoader): Fetcher?
    }
}
Coil 은 그 구현이 비교적 단순하여, fetch() 메서드의 구현만 살펴보면 끝입니다. 물론 자세한 과정 (통신 준비 및 콜백 처리, 소스 디코딩 등) 이 포함될 수는 있지만요. 해당 포스트에서는 이미지를 가져오는 과정에 대해서만 서술하고자 합니다.
private suspend fun fetch(
    components: ComponentRegistry,
    request: ImageRequest,
    mappedData: Any,
    options: Options,
    eventListener: EventListener
): FetchResult {
    val fetchResult: FetchResult
    var searchIndex = 0
    while (true) {
        val pair = components.newFetcher(mappedData, options, imageLoader, searchIndex)
        checkNotNull(pair) { "Unable to create a fetcher that supports: $mappedData" }
        val fetcher = pair.first
        searchIndex = pair.second + 1

        eventListener.fetchStart(request, fetcher, options)
        val result = fetcher.fetch()
        try {
            eventListener.fetchEnd(request, fetcher, options, result)
        } catch (throwable: Throwable) {
            // Ensure the source is closed if an exception occurs before returning the result.
            (result as? SourceResult)?.source?.closeQuietly()
            throw throwable
        }

        if (result != null) {
            fetchResult = result
            break
        }
    }
    return fetchResult
}
일단 suspend 키워드가 붙어 CoroutineContext 위에서 호출됨을 알 수 있습니다. fetcher 의 fetch() 메서드를 호출하는 정도로만 작성되어 있습니다. 즉, 자세한 구현은 fetcher 에 따라 달라질 수 있음을 의미합니다.
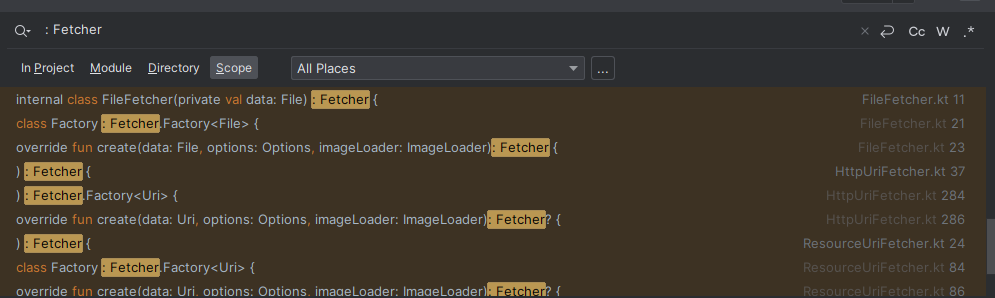
fetch() 메서드는 Fetcher 의 메서드이므로, Fetcher 를 구현하는 구현체를 찾습니다. 다양한 구현체가 검색되었지만, 보통은 네트워크에서 이미지를 얻어 오는 것에 익숙하니, HttpUriFetcher 를 살펴보면 될 것 같습니다.
var response = executeNetworkRequest(cacheStrategy.networkRequest!!)
HttpUriFetcher 의 fetch() 메서드 중 일부입니다. 이 response 를 넘겨주고, Decoder 가 이를 사용하여 유저에게 보여줄 이미지를 생성하도록 합니다. executeNetworkRequest() 메서드의 구현은 다음과 같습니다.
private suspend fun executeNetworkRequest(request: Request): Response {
    val response = if (isMainThread()) {
        if (options.networkCachePolicy.readEnabled) {
            // Prevent executing requests on the main thread that could block due to a
            // networking operation.
            throw NetworkOnMainThreadException()
        } else {
            // Work around: https://github.com/Kotlin/kotlinx.coroutines/issues/2448
            callFactory.value.newCall(request).execute()
        }
    } else {
        // Suspend and enqueue the request on one of OkHttp's dispatcher threads.
        callFactory.value.newCall(request).await()
    }
    if (!response.isSuccessful && response.code != HTTP_NOT_MODIFIED) {
        response.body?.closeQuietly()
        throw HttpException(response)
    }
    return response
}
okHttp3 의 Response 를 사용하고 있습니다. 생성된 Response 는 이전에 기술하였듯, Decoder 로 넘겨 화면에 표시할 작업들을 위해 사용됩니다.
대부분의 메서드는 suspend 키워드가 붙어, 추가로 스레드를 생성하는 것이 아니라 백그라운드 스레드에 dispatch() 되어 CoroutineContext 상에서 작동합니다.
해당 메서드에 넘겨지는 request 는 newRequest() 메서드를 통해 생성됩니다.
private fun newRequest(): Request {
    val request = Request.Builder()
        .url(url)
        .headers(options.headers)

    ... // 캐시된 데이터를 사용하는 로직

    return request.build()
}
너무나 단순하게도, okHttp3 의 Request 와 Response 를 활용하여 이미지를 얻어 옵니다.
정리
Glide 의 경우, 내부적으로 워커 스레드를 생성하여 해당 스레드에 Runnable 객체를 전달, 워커 스레드 내에서 HttpUrlConnection 을 통해 데이터를 불러 옵니다.
Coil 의 경우, 내부적으로 CoroutineDispatcher 를 통해 유휴 스레드에 Job 을 전달, CoroutineScope 내에서 OkHttp3 를 통해 데이터를 불러 옵니다.
그 이후의 수순은 각 Decoder 에 넘겨 화면에 표시할 처리를 수행합니다.
'뭐가 더 낫다' 라고 섣불리 말할 순 없겠으나, Jetpack Compose 와의 통합, 그리고 내부 동작 방식에 근거하여 Coil 을 선택할 수 있었습니다.
Glide 의 경우, 코틀린이 보편화되기 전부터 이용되어와서, 당연히 스레드를 열고 내부적으로 HttpUrlConnection 을 사용할 것이라 예상했었는데, 예상이 들어 맞아 재미있었습니다.
Coil 의 경우도 어느 정도 알려진 바가 있어 코드를 읽으면서 금방 납득했던 것 같습니다.
Coil 이 Glide 를 많이 참고했다는 글을 어디선가 본적이 있는데, 실제로 내부 구현이 굉장히 유사합니다. 이러한 부분도 재미있는 포인트였던 것 같아요.
앞으로도 수많은 프로젝트를 수행하게 될텐데, 그 때마다 아마 이미지 처리 라이브러리 선택에 대한 고민이 따를 것 같습니다. 물론 Coil 을 사용하게 될 것 같지만요.
'Android > Tech' 카테고리의 다른 글
| [Jetpack Compose] Clickable 이 외의 Ripple Effect 없애기 (0) | 2023.11.15 |
|---|---|
| [Jetpack Compose] CompositionLocal 은 어떻게 동작하는가? (0) | 2023.11.15 |
| VersionCatalog 적용기 (5) | 2023.11.09 |
| Activity Lifecycle 의 각 콜백 메서드에서는 어떤 처리를 하는가? (0) | 2023.10.24 |
| LayoutInflater 가 xml 을 객체화 하는 과정 (0) | 2023.10.17 |


